Definitions
Organization: A department or division at Lane Community College. Each entry in the directory includes specific details about the organization and links to the profiles of its employees.
Employee Profile: This is the directory entry for an individual employee, which contains personal and professional information about that employee.
Organization Membership: This entry connects an employee’s profile to their organization and includes information about their role within that organization.
How to log into the online employee directory:
Only employees who should be visible in the directory can log in. See the Employee Directory COPPS Procedure.
If you have asked HR to exclude you from the directory, or asked for confidentiality, you will not be able to log in, and your entry will not be allowed on the directory.
Steps to Log In
- Click on the “Log In” link in the top right corner.
- Enter your credentials as you normally do with Lane CAS.
- If you have recently logged into another Lane CAS service, you will simply be logged in without having to reenter your information.
- You will be redirected back to the directory.
Editing Your Employee Profile
- After logging in, click on the "My Account" link in the top right corner.
- Go to the "User Content" tab located below your name; it's the third tab from the left.
- You will see a table on the next page.
- Look for the "Edit" column on the far right of the table.
- In the "Content Type" column, find "Lane Employee Profile."
- Click the "Edit" link in the same row as "Lane Employee Profile."
Editing Your Organization Membership
- After logging in, click on the "My Account" link in the top right corner.
- Go to the "User Content" tab located below your name; it's the third tab from the left.
- On the next page, you will see a table.
- Look for the "Edit" column on the far right of the table.
- In the "Content Type" column, find "Lane Organization Membership." (If you're a member of multiple organizations, you'll see several rows, each labeled with the organization name in the Title.)
- Click the "Edit" link in the row that corresponds to "Lane Organization Membership."
How to change your name
See the Employee Directory COPPS Procedure.
How to change your email
See the Employee Directory COPPS Procedure.
How to opt out of, or exclude yourself from, the online directory
See the Employee Directory COPPS Procedure.
How to Change Your Organization
Your department administrator can update your directory information. Please reach out to them for assistance.
If they are unable to help, contact Software Services at help.lanecc.edu and provide the following information:
- Your Name
- Your L-Number
- The department(s) you should be listed under.
How to Change Your Primary Phone Number

- Follow the "Editing Your Employee Profile" instructions.
- Scroll down to the "Primary Phone" input box.
- Highlight and delete any existing text.
- Enter your phone number in this format: (541) 463-NNNN.
- Scroll down and click the "Save" button.
How to Change Your Secondary Phone Number
Follow the same steps as for your primary phone number, but use the “Secondary Phone” input box.

How to Change Your Primary Office

- Follow the "Editing Your Employee Profile" instructions.
- Scroll to the "Primary Office" field.
- Use the input box to filter for your office and click the "Apply" button.
- Use 25Live format, such as LCC02 201 or CEN 407.
- If your office isn’t found, reach out to Software Services at help.lanecc.edu. Include your name, L-Number, and what you entered in the filter box. Screenshots will help.
- To select the office, simply click it in the dropdown.
- Finally, scroll to the bottom of the profile edit form and click the "Save" button.
How to Change Your Secondary Office

Follow the same steps as for your primary office, using the “Secondary Office” field.
How to Set/Change Your Office Hours

- Follow the "Editing Your Employee Profile" instructions.
- Scroll down to the "Office Hours" form.
- Fill out the form with your hours. You can use the Comment field for specific office hours or additional information.
- Once done, scroll down and click the "Save" button.
Note: Your "Office Hours" will only display on your main profile view, which is the page you reach when you click your name or picture on department or search pages.
How to Set Your Second Language

- Follow the "Editing Your Employee Profile" instructions.
- Scroll down to the "Second Language" field.
- Toggle each language you know.
- Save your profile at the bottom of the page.
How to Change Your Professional Biography

- Follow the "Editing Your Employee Profile" instructions.
- Scroll down to the "Professional Biography" form.
- Enter your information; you can use basic HTML for formatting.
- When finished, scroll down and click the "Save" button.
Note: Your "Professional Biography" will only show on your main profile view.
How to Change Your Photo
- Follow the “Editing Your Employee Profile” instructions.
- Choose a work-appropriate photo.
- For best results, ensure the photo is in a square format.
- Make sure the file size is less than 50MB.
- On the edit profile form, scroll down to the “Picture” field:
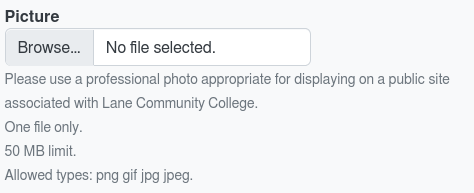
- If it’s empty, you will see a file upload form.
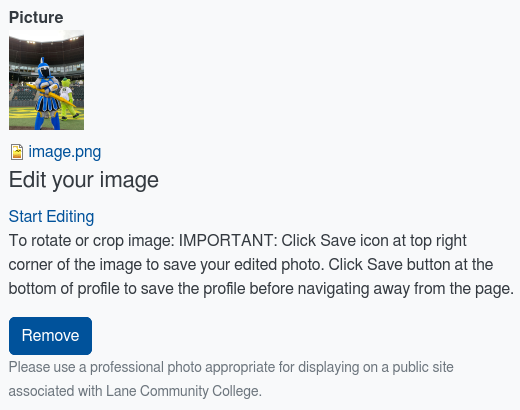
- If there is an existing picture, click the “Remove” button before uploading a new one.
- Browse for and select your photo.
- Once the photo is uploaded, save your profile.


Picture Rotation and Cropping
After uploading your photo, you can rotate and/or crop it.
- Click the “Start Editing” link under the "Edit Your Image" heading.
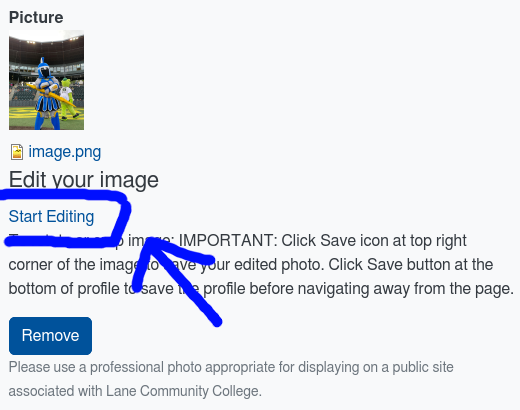
- This will open a widget with rotation and crop tools.
- To rotate your image:
- Click the icon with an arrow in a circle.
- Use the buttons in the menu that appears to rotate your image.
- Click the icon with an arrow in a circle.
- To crop your image:
- Click the small "Crop" icon.
- Use the crop handles to choose the area of the picture you want to keep. Then apply the crop with the checkmark icon.
- After you're done with rotation and/or cropping, click the small save icon in the top right corner of the widget to save your changes.
- Click the small "Crop" icon.
- Finally, scroll down and save your entire profile at the bottom of the page.


How to change your job responsibilities
- Follow the Editing Your Organization Membership instructions
- If you are part of multiple departments, then click the appropriate edit link.
- On the edit page, scroll down to the Job Responsibilities section.
- Enter up to 5 items.
- The limit is 5 since this data will be displayed in a relatively small space.
- When you are done, just click the "Save" button.
- Now your responsibilities will be displayed on your profile entry.
- (Note that we use tooling to increase the directories performance that can result in some delays before changes are visible to anonymous users.)
How to change your job title(s)
Please follow the "How to change your job responsibilities" instructions above, just edit the "Job Title(s)" field instead of the "Job Responsibilities" field.
F.A.Q.
When will my changes be visible?
Data changed in myLane/Banner should be synced to the directory within an hour.
Data changed directly on directory.lanecc.edu will show up as soon as you save. (We do use a tool to improve performance for anonymous users that might cause your changes to no be visible immediately. So if you don't see the changes show up immediately when you are not logged in, please give it some time.)
If your changes fail to show up within a day, please contact Software Services via help.lanecc.edu. Include your name, LNumber, and what you were trying to change. Make sure to mention that the request is about directory.lanecc.edu. (Just "directory" can mean several other things.)
What data lives in myLane/Banner?
- Employee:
- Names
What data lives in the Directory itself?
- Department
- Office
- Office Hours
- Phone
- Description
- Employee
- Photo
- Office Hours
- Professional Biography
- Job Responsibilities
- Department Membership
- Office and Phone information
Why am I, or a co-worker, not listed in the correct department?
(Or not listed at all)
Who is listed in the directory is left up to each Department. Please ask your department admin to make sure you are added to your department. If they are unable to help, please contact Software Services via help.lanecc.edu. Include your name, L-Number, and what department(s) to add/remove your profile from. Make sure to mention that the request is about directory.lanecc.edu. (Just "directory" can mean several other things.)
My department name is wrong, has a typo, or has otherwise changed, how do I fix it?
Contact your department admin and ask them to fix it. If they are unable, please contact Software Services via help.lanecc.edu with which department is incorrect and what the correct name should be. Make sure to mention that the request is about directory.lanecc.edu. (Just "directory" can mean several other things.)
I can't log into the directory, or otherwise receive some kind of "Access Denied" error after following the "How to log into the online employee directory" instructions at the top of this page.
Contact Software Services via help.lanecc.edu with your name, L-Number, what time you received the error, and what your browser's address/url bar says on the page you received the "Access denied" error.
You also might check if you have had a confidential hold set, or asked to be blocked from the directory. In either case your data is prevented from being pulled into the directory entirely.
I'm still stuck, even after reaching the end of this page! Help!
Please submit a Software Services Team Requests ticket on help.lanecc.edu. Make sure to mention that the request is about directory.lanecc.edu. (Just "directory" can mean several other things.) We'll get back to you as soon as we can.